How to Use Heat Seal Tape for Effective Sealing and Repair?
Heat seal tape is gaining popularity in various industries for sealing and repair applications. According to recent market research, the global adhesive tape market is expected to grow significantly, driven by the increasing demand for durable sealing solutions. This trend highlights the importance of using reliable products like heat seal tape, which provides strong bonds even in challenging conditions.
In construction and manufacturing, proper sealing can prevent costly leaks and improve efficiency. Heat seal tape is designed to withstand extreme temperatures and environmental stress, making it a preferred choice for many professionals. However, not all heat seal tapes are created equal. Users often overlook the specifications and compatibility of the tape with their materials. This can lead to failures that require additional repair efforts.
Moreover, while heat seal tape can be an effective solution, improper application may result in inadequate sealing. It is crucial to follow guidelines for the best results. Recognizing these challenges can help users optimize their sealing strategies. Ultimately, understanding the right techniques and choosing the right heat seal tape can significantly impact project outcomes.
Understanding Heat Seal Tape: Types and Applications
Heat seal tape is a versatile tool in various sealing and repair tasks. Understanding the different types can help you select the right one. There are two main categories: nylon and polyester. Nylon heat seal tape offers great strength for tougher repairs. Polyester, on the other hand, is more suitable for lightweight materials. Each type has its own unique characteristics and ideal applications.
Using heat seal tape effectively can be straightforward, but preparation is key. Clean the surface thoroughly to ensure good adhesion. Measure the length needed and cut it carefully. Place the tape without any creases or bubbles. Heating the tape uniformly is crucial. Inadequate heat can lead to weak seals. Too much heat might damage the material. It's essential to find that balance.
While heat seal tape is convenient, challenges can arise. It works well on many surfaces but may not bond perfectly with every material. Users often encounter issues when applying it on uneven or porous surfaces. Patience and attention to detail improve results. Experimenting with different methods can lead to better sealing outcomes.
Preparing Surfaces for Effective Sealing with Heat Seal Tape
Preparing surfaces for effective sealing with heat seal tape is critical for achieving durable bonds. The integrity of the surface directly affects adhesion quality. Cleanliness is essential. Dust, oil, and moisture can weaken the seal. Studies show that a clean surface can improve adhesion strength by up to 50%. Always inspect your materials before application. Any imperfections might lead to failure later.
When preparing surfaces, use appropriate cleaning agents. Mild solvents or detergents are typically recommended. Dry the surface completely after cleaning. The temperature is also crucial. The ideal range for effective sealing is between 70°F and 100°F. If it's too cold, the adhesive may not activate properly. If it's too hot, the tape might not stick well.
Some users overlook the importance of surface texture. Smooth surfaces may require additional preparation. Rough surfaces may promote better adhesion but can also trap dirt. Remember, a rough surface might not yield the desired seal due to inconsistencies. An ideal preparation process considers all these factors. Each step is an opportunity for improvement. A mistake in the preparation phase can lead to a wasted effort.
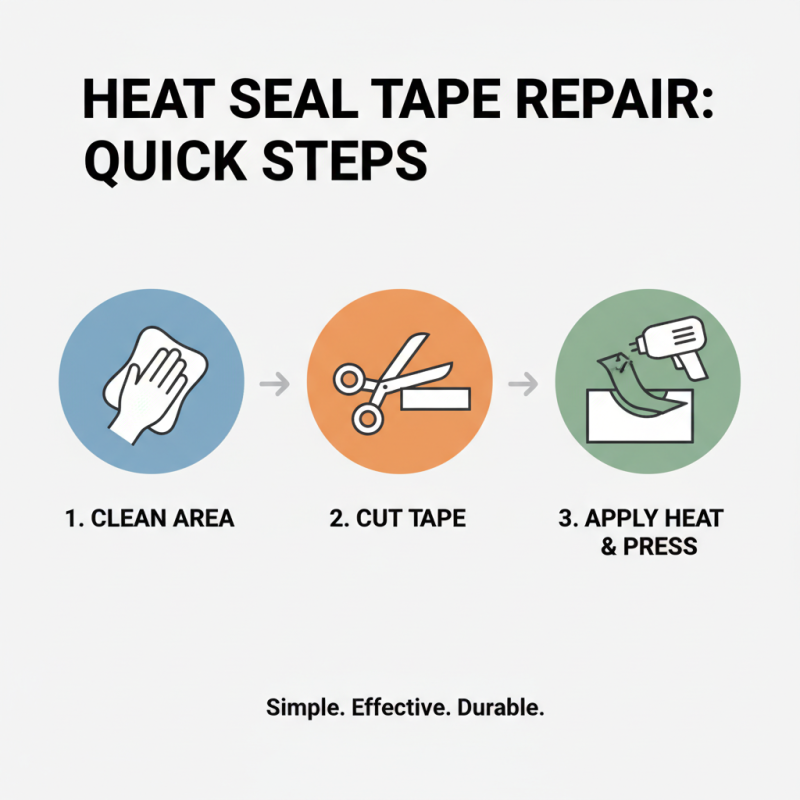
Step-by-Step Guide to Using Heat Seal Tape for Repairs
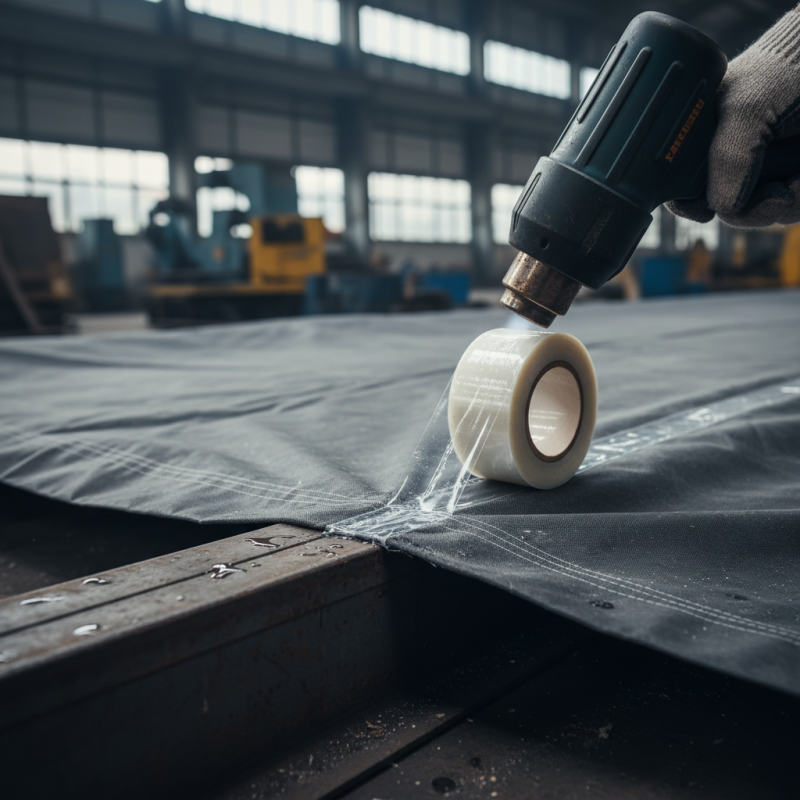
Using heat seal tape for repairs can be a simple yet effective solution. Ensure you gather all necessary tools before starting. You’ll need heat seal tape, a heat source, and scissors. It’s important to clean the area needing repair. Dirt or grease can prevent a strong seal. Cut the tape to an appropriate length; too small may not hold well, while too large is wasteful.
Apply the tape carefully over the damaged area. Make sure it overlaps the edges slightly. Using a heat source, gently heat the tape. Watch for any melting or bubbling, which can indicate overheating. If you notice this, pause and allow it to cool. Once completed, test the integrity of the seal. If it feels loose, you may need a redo. Think about your approach. Did you change the temperature too quickly? Did you hold the heat source in one spot too long? These details matter.
Always evaluate your method. A perfect seal is ideal, but real-life conditions can alter results. Experimentation is key. Each repair is a learning opportunity. Sometimes, it might take a couple of tries to get it right. Keep notes on what worked and what didn’t. This way, you'll improve with each repair attempt.
Common Mistakes to Avoid When Using Heat Seal Tape
Using heat seal tape effectively requires attention to detail. Many users make common mistakes that can compromise the quality of their seals. One major error is not cleaning the surface before application. Dirt and oil can significantly hinder adhesion, leading to premature failure. According to industry reports, nearly 30% of seal failures arise from inadequate surface preparation.
Another frequent mistake is applying heat carelessly. Overheating can damage both the tape and the materials being joined. Conversely, insufficient heat may prevent a proper bond from forming. A study found that nearly 25% of users do not use a thermometer or appropriate heat source, leading to inconsistent results.
Tips for a successful application include testing a small area first. This helps gauge the right temperature. Also, use steady, even pressure when applying the tape. Remember, rushing the process often leads to mistakes. Take your time to achieve the best results.
Maintenance and Best Practices for Long-lasting Seals
Using heat seal tape effectively requires attention to maintenance and best practices. It’s essential to keep the surfaces clean before applying the tape. Dust and grease can prevent a strong bond. A simple wipe-down with isopropyl alcohol can make a significant difference. The tape should adhere not only to the primary material but also take into account the environment. Humidity and temperature can impact the performance of the seal.
Long-lasting seals depend on proper storage of the tape. Roll the tape back after use to avoid damage. Store it in a cool, dry place, away from direct sunlight. Proper application plays a crucial role, too. Overlapping the tape may lead to weak spots. Ensure to press down firmly to eliminate air bubbles. Yet, many users overlook this simple step, leading to potential failures in their repairs.
Consider the project's specific needs. Some situations may require additional support alongside the tape. For instance, using a clamp can help secure the bond while it cures. Remember that imperfections in application are learning opportunities. Reflecting on each experience will help you improve future projects. Attention to these details can elevate your sealing skills significantly.
Heat Seal Tape Effectiveness by Application Type